Some time ago I started porting my application DA-FormMaker for the Mac. After finishing the development, the app needs to be signed with the Developer ID. Otherwise your users will end up with some message like:

OK its german, but it means: I don’t know that developer and I will not start that application. So the app needs to be signed. Fair enough.
It took me some time to find out the steps needed for that, thats the reason why I am documenting it here. 🙂
Note: That procedure here is not for App Store applications.
Preparations
OK lets start!
The first thing is, you need to have Mac Developer Account for 100$ a year to get the certificates to sign the application.
If you have a developer account you have to create the developer certificates. Easiest way to do that is the XCode Organizer:

Click on your Mac and "Add to member center". The next dialog will ask you if you want to create/request the certificates needed.
The procedures takes some time and it told me that the process is still ongoing and I’d like to refresh the certificates in the accounts section of the Xcode preferences. OK lets do that.
If you have not done that before, enter your Apple ID first. Then hit the refresh button. It should show the certificates that are not installed:

Install the certificates in XCode. I am not 100% sure if that step it really needed. In order to sign the Firemonkey application via command line, we have to install the certificates in our key chain.
To do that, we have to download the cerficate from the certificates section in the developer account:
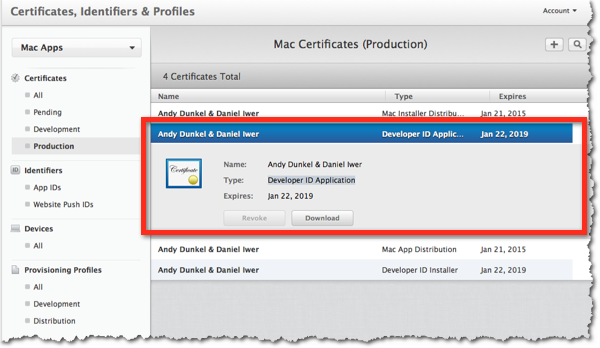
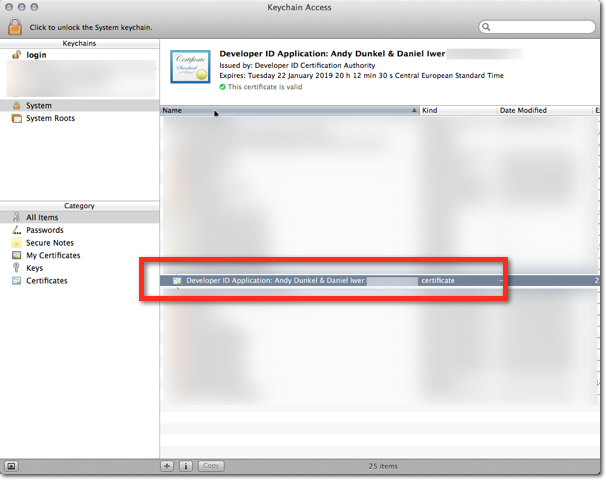
Save the file to your local disk and open "Keychain Access". Select "File" -> "Import Items". Now select the *.cer file you just downloaded and the destination. I choosed system. The certificate should now show up in the list:
If you right click and select "Get Info" on the certificate, you see the properties of the certificate:
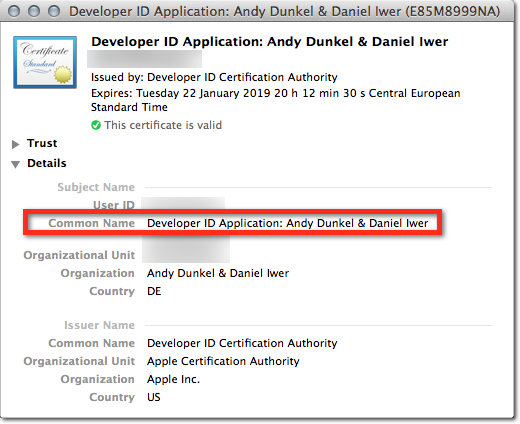
You can copy the common name here, which we will later use on the command line to sign the application.
Firemonkey
The next step is the release build of your Firemonkey Application. Select the settings for the build and compile the application.

After complilation the application should be on your Macs file system in /Users/username/RASPASever/scratch-dir/…
If the application runs correctly then its time to finally sign the application.
Signing
To do that open a console and switch to the applications folder. Sign the application with the following command:
codesign -f -s "Common Name" -v "application_name.app" --deep
Enter the common name mentioned above and the application name. Here is an example:
da$ codesign -f -s "Developer ID Application: Andy Dunkel" -v "daform.app" --deep
daform.app: signed bundle with Mach-O thin (i386) [daform]
You can check the validity of the signing with the following command:
spctl --verbose=4 --assess --type execute DA-yourapp
It should return something like:
DA-FormMaker.app: accepted
source=Developer ID
I first run into a problem. The app was not signed correctly. It told me that "my.app is damaged and can’t be opened. You should move it to the trash.". And the check above returned:
DA-FormMaker.app: a sealed resource is missing or invalid
The problem? Turned out that I made a mistake and had other files in the "MacOS" folder of the bundle. I moved those to "Resources" and everything was OK.
Congratulations: After that your app is signed with your developer id!