MapKit offers an easy way to integrate Apple maps into your app. Wether you want to show where your company is located, where the next pub is or track your cats GPS location in an app.
In this tutorial I want to describe how you can add maps to your application. Position, zoom the map and add annotations.
Create the project
In XCode create a new project, select iOS and single view application and enter the details for project. Once the project is created. The first thing we are doing, is adding the MapKit to the linked frameworks:

Otherwise the application will crash instantaneously. Once we have done that, we go to the main storyboard and drag the map view into our view.

In the properties of the MapView you can configure some basic settings, like showing the users location, activate / deactive zooming, rotating, scrolling etc…
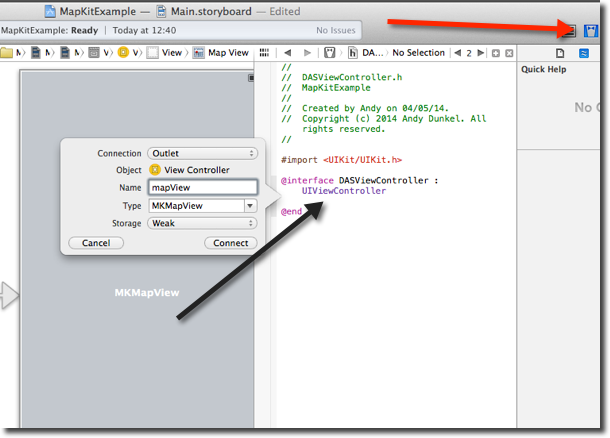
The next step is to create the Outlet for the map view in our application. This can be done using the Assistant editor and CTRL dragging the MKMapView onto the header file and enter a name for the variable:
We also need to add MapKit to the imports. While we are doing that we also add the map delegate:
#import <MapKit/MapKit.h>

@interface DASViewController : UIViewController <MKMapViewDelegate>
Lets run the app for the first time. It should now display the map.
Setting the Map Type
For maps there are three types how to display the map: Standard, Satellite and Hybrid. While you can set these in the properties, you might want the user to be able to choose the type.
For that we are adding a segmented control to the view and CTRL drag an IBAction to our .m file:

…and implement the action method:
    - (IBAction)setType:(UISegmentedControl *)sender {
    switch (sender.selectedSegmentIndex) {
        case 0:
            self.mapView.mapType = MKMapTypeStandard;
            break;
        case 1:
            self.mapView.mapType = MKMapTypeSatellite;
            break;
        case 2:
            self.mapView.mapType = MKMapTypeHybrid;
            break;
        default:
            break;
    }
}
When we start the application we are now able to switch between the different map types.
Zoom to a specific location
While the map currently defaults to specific position, we now want to set a location / area on our own by default.
To do that, we add the following code to our viewDidLoad method:
- (void)viewDidLoad
{
    [super viewDidLoad];
    // Create your coordinate
    CLLocationCoordinate2D myCoordinate = {47.879854, 10.641000};

    //set location and zoom level
    MKCoordinateRegion viewRegion = MKCoordinateRegionMakeWithDistance(myCoordinate, 1000, 1000);
    MKCoordinateRegion adjustedRegion = [self.mapView regionThatFits:viewRegion];
    [self.mapView setRegion:adjustedRegion animated:YES];

}
Lets have a look to the details:
CLLocationCoordinate2D myCoordinate = {47.879854, 10.641000};
Coordinates are longitude and latitude of the position. Best way to find out for a place is Google Maps. The zoom level is adjusted in the following line:
MKCoordinateRegion viewRegion = MKCoordinateRegionMakeWithDistance(myCoordinate, 1000, 1000);
This is defined in metres, in our case we want to have a 1000 meters zoom level. When we launch the app now, it should default to the given position.
Add annotation
The next step for us is to add an annotation to the map. We add the following code to the viewDidLoad method:
 //Create your annotation
MKPointAnnotation *point = [[MKPointAnnotation alloc] init];
// Set your annotation to point at your coordinate
point.coordinate = myCoordinate;
point.title = @"Andys Home";

//Drop pin on map
[self.mapView addAnnotation:point];
The code is best added before we do the zoom we did before.
Remove all annotations
To remove all annotations from the map:
for (id annotation in self.mapView.annotations) {
    [self.mapView removeAnnotation:annotation];
}
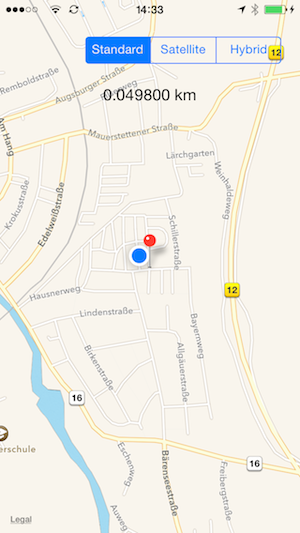
Showing the users location
The last thing we want to do is do something with users location. The users location is only available if the user enabled the function. The user is asked wether he wants to share his location or not, when the function is first called. To enable that in XCode activate "Show Users Location" in the MapViews properties.
Also drop a label on the view and create an outlet for it:
@property (weak, nonatomic) IBOutlet UILabel *labelPosition;
To update the user location, we are using the delegate we defined in our header file and assign the delegate to the mapView:
self.mapView.delegate = self;
Now we implement the method for the update:
-(void)mapView:(MKMapView *)mapView didUpdateUserLocation:(MKUserLocation *)userLocation {

    CLLocationCoordinate2D myCoordinate = {47.879854, 10.641000};
    CLLocationCoordinate2D userCoordinate = [[[self.mapView userLocation]
                                              location] coordinate];

    CLLocation *myLoc = [[CLLocation alloc] initWithLatitude:myCoordinate.latitude
                                                   longitude:myCoordinate.longitude];
    CLLocation *userLoc = [[CLLocation alloc] initWithLatitude:userCoordinate.latitude
                                                     longitude:userCoordinate.longitude];

    CLLocationDistance distance = [myLoc distanceFromLocation:userLoc];

    NSString *labelText = [NSString stringWithFormat:@"%lf km", distance / 1000];

    [self.labelPosition setText:labelText];
}
The method gets called everytime the user position gets updated. It calculates the distance between the users position and the predefined location. The result is then shown on the label we just dropped on the view:
The end
Well thats it for some quickstart with MapKit. You can download the source code of the example here.